Changes in WordPress

There has been a recent upgrade to WordPress over the past month. I am not sure if the “new features” in this release, or whether it was the one before have introduced some monitoring functions on the installation. WordPress continues to improve all of the time. There is a large network of people across the world who develop and test new releases. 

Careful with that axe Eugene

I have some websites which are centrally controlled. I hit an update button and the websites update. It is not perfect, it sometimes stalls and often leaves a trail of error messages that I need to follow up. After coming back to the UK following a 4 week vacation, I opened the application and ran it and got a screen full of errors. It is fortunate I did not do this while I was on holiday. Starting at 4am on the 11th of November when I hit the button it took me 5 hours to go through 15 sites which had now broken. (I started at 4am because my head was still in a differnt time zone!). 

What happened?

When I went around to look at each site, some or all of the updates had failed to update. The controlling program had reported that the websites were “unresponsive”. I logged into them and checked them, then ran the updates from within the website. I updated the plugins first. Then the template. After updating the plugins I received a message that “The site is experiencing technical difficulties……”  It turns out there is also an email which outlines the technical difficulties. I had not seen this before. The message in the email turns out not to be directly related to the cause. In all cases the sites eventually came back online. 

New Health Checking Features

It looks like I had triggered a recently introduced function in the wordpress core which monitors exceptions (crashes) of processes. It had identified something was wrong and halted the site. While it is good to have such features, it turns out they were not wholly reliable in identifying the problem. 

It looks like an upgrade in some but not all cases may trigger this event to happen. What follows is a white screen for around 5-10 minutes with a message on it saying this website is experiencing technical difficulties. It will eventually clear down. If you initiate your own updates and see this, don’t panic. In all cases where this happened to me, it was resolvable. I have already taken action to upgrade the PHP Scripting language the websites run on to the latest version (a possible reason).

I am talking to the hosting company about this as well, as it is not entirely clear why it is happening. It may be because of some housekeeping function which has not triggered, and that needs to run before the website becomes stable again. It may just be a new “feature” in wordpress.

If you see a white screen at any time with just one line of text in it, send me a message and note the time, and what you did at the time. I will check it. These should only be transient events. All sites are set up to upgrade themselves, they usually do this without any problems, but they do not do it immediately the upgrade is detected.  

Newsletters and MailPoet 3

I have been a fan of Mailpoet (integrated newsletter plugin) in sites for some years now. Around 18 months ago MailPoet changed from version 2 to version 3. Development work stopped on version 2. I have upgraded, or some of you may have upgraded yourselves to Mailpoet3. One significant change is the presence or absence of images in Newsletters.

Featured Images in Posts

When you create your newsletter you add existing posts into the newsletter. Mailpoet 2 used to pick up the first image and include it your newsletter. Mailpoet 3 does not work that way. It means that you may have had vibrant interesting newsletters before, but now they are all text.

Continue reading Newsletters and MailPoet 3

Reminder on handling images on your site

There is one recurring theme as I work my way around various websites, handle support issues, or work with new clients on importing old websites to a new framework. It relates to images. To ensure your website runs quickly, and does not waste bandwidth you need to optimise your images before they are placed on the website.

Over the years I have offered various guidelines on sizes, it often depends on the size of your template. But the core guidance remains the same. Do not upload an image to your website without scaling it down first.

Images are getting larger and larger with high resolution sensors. Your camera may well be able to produce an image which is 5000 pixels wide. However your website is only 1000 pixels wide, and the available space for an image in some cases may only be 500px wide.

Please check out this video which I put on the site a couple of years ago. It talks about free image editing software called IrfanView and how to use it.

Get me started Mark…

For the past year I have been building an editing support page which is set to private, so only you can see it. Within this page is a guide for editors and lots of additional resources, all online and built into your website.

With the changes in the Divi template (Visual Editor), I have made some changes to one of the guides I have been placing on sites.

If you are familiar with guide, you can download an updated copy here. This will tie into a template that is built into your site which is the first step for creating a news item.

Get your copy here: Get me started guide (Revised)

For those of you that would like something like this in your site, download a copy and see if you think it would help. Drop me a line and I will see if it is feasible to add in.

If you already have an Editor or equivalent page, locate the page, open it in the editor and attach this version to the button for the Get Me Started Mark guide. If you are one of the recently upgraded Home-Start websites, I have already added it in.

New Divi Guidance PPT

For the past six months I have been building in help pages into the websites to enable novice editors to manage their sites themselves without having to seek external help. Following some recent changes in the way Divi works, I have revised that guidance to include new methods of editing.  I am going to use the attached guidance from now on, and develop this futher with accompanying videos.

For now, if your site is based on Divi (If I built it over the past three years, it probably is), then this is for you. Please take a copy. But do note that unless I have already done so, there is something you need to change in your site before you can follow the revised guidance. The PPT contains a link on what to change.

Don’t procrastinate, these changes are significant and will make your casual editing process much easier, so it is worth doing now. Click on the button below to download your copy.  If I make any changes I will note the revision on this page and update this page. So come back if anything looks broken.

Auto remove old posts

From time to time people ask if it is possible to automatically remove old posts. While it is possible to add a post in the future by setting the publish date in the future, I am not aware of anything that allows them to be automatically removed. At least not without adding something to your website to enable that to happen.

Post Expirator

This is plugin which is developed by Aaron Axelsen. You can find out about it here:https://wordpress.org/plugins/post-expirator/. I generally look at the star ratings and number of installations to judge whether something is any good. In this case it scores 4.5 stars (out of 5) and 90,000+ installations. 

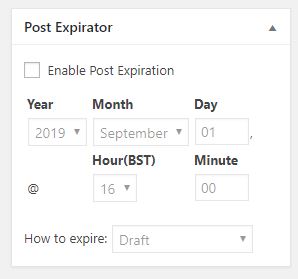
I have installed this on several sites now, and will use it as standard with the plugins I normally use. Once installed the plugin adds a field to pages and posts which allows you to set an expiry date and time. 


With the plugin enabled, everything in the site has this panel in the editing view from the dashboard. To get it to work all you need to do is check the box Enable Post Expiration and then set a date and a time. 

There are different ways of expiring a post. I recommend you leave it on the default which will hide it from view by changing the status from Public to Draft. That way you do not lose it if you make a mistake. 

The only problem with this approach is you have to remind the editors to set the parameter. But if you do that the site will ultimately look cleaner. You might only wish to do this for events that have expired. 

How do I add it in?

Log in, go to Plugins in the side menu. Go to Add new, and search for “Post Expirator” by Aaron Axelson. Install it and activate it. Then take a look at a post and will see the new field added. 

Time for a tidy up?

I have spent most of my time over the past 10 weeks redeveloping Home-Start websites from old branding to new branding. In all of these cases they were websites which I released 2-5 years ago. So some were quite old. My general philosophy for editing websites is that I will provide you with the knowledge and skills for you to edit your own website so you can keep your costs down.

Many of the sites have had multiple editors, a few have had a single editor over that time. I found in some cases that sites had content added but had not followed some of the simple guidelines I put together when the sites were first set up. Additionally links which leave the site, did not open in a new tab or window, so anyone clicking on one and not realising, would not be able to get back. Large text was used where headings should have been used (vitally important for effective SEO).

Fix as you go

While reworking the Home-Start sites I have gone through each and checked the contents, reformatted it, and reorganised it to optimise it for the various screen sizes. I have fixed links that did not work properly, or had failed completely.

For each of the Home-Start rebranding projects, I am offering training through a variety of mechanisms, most are on site and face to face, but I also have video tutorials as well.

How is your site looking?

If you have new editors, or your site is looking a little fragmented, do get in touch. I can do several things from remotely going through your website and checking it, fixing things on the way, to conducting training for new people. It may be worth considering an annual tidy up to identify and fix any problems, and most importantly some tips to correct the editing process so that they do not reoccur. 


Divi Visual Builder

Around six months ago Divi introduced a Visual Builder button in the black menu bar which runs across the top of your screen when you are viewing a page (and logged in). 

I think it is the view of the developers of this templating system that everyone builds their website using this system. Most professional web editors still prefer to design from the inside, finding the visual builder a bit too cumbersome. and depending on some external factors it does not always give you a true “visual representation” of the content. 

That said, however it is very useful if you need to do some tweaks to the existing content on your site. In truth I am starting to use it more and more, largely because the developers have hidden parameters in some elements which are only accessible through the visual view of the website. 

What is a Visual Editor?

The concept of a Visual Editor is you get to actively edit the layout and content as the user sees the site. So all of the formatting is retained, and accessible. To the extent that you can also manage the spatial relationship between editable blocks as well as the content within the block. 

Why should I be interested in this?

It is intuitive to use, and is probably the easiest way to make minor changes on your website. Given that you are not editing every day, or every month for most of you, editing skills will be lost. This method is easy to remember. I have created a short video tutorial on this. 

Video

The video I have created is very short, and shows me opening up a page on a website, turning on the visual editor, locating a block of text, opening it and editing it, closing the visual editor and saving the changes. On this video there is no sound. I found that many of my clients were using old computers with no speakers of headsets available in the office. So I have omitted a soundtrack on this one. Text is used on the screen to tell you what you need to know.  Give it a try and let me know how you get on with it. 

I have added the video to the Video Tutorials page, but I will also give you a link to it here. 

Divi Visual Builder Demonstration (opens in a new window) at YouTube.


Managing News

With all of my attention on Home-Starts over the past few months, I have been looking carefully at some of the slightly older sites and thinking about how they could be improved. I have also had some specific requests that have come in and based on both those and some of my other ponderings I have come up with the following idea. Depending if and when you were in the Home-Start upgrade cycle you may have this. If you have not, you can request it and I will add it in for you. 

The Problem

When you add news to a website it is generally shown on the news page. Which means someone has to find the news page to see it.

Some websites have the home page featuring news, but then the page can become very messy and confusing for someone landing there.

For this reason I started putting the last three news items on the home page, so anyone landing on a site and viewing the home page could see the latest news. With Divi this is very easy to do, it can also be done on a non divi website, but is more complicated to achieve the same result. 

Then a request came in to control what is on the home page. Up to this point I had displayed the last three posts based on when they were added automatically. 

The Solution

For the blog section on the home page, make it a filtered blog and only show things in a special category. In my case I simply created a category called Front Page and checked the box. All posts with this box checked will appear on the front page of the website. Well the last three based on the published date. So if you publish a fourth item one will disappear. 

This means your key or high profile news items can now be controlled. So you publish it once, and it can appear on the generic news page, and also on the home page. All of this is automatic. 

Extending this further……

When you consider the behaviour of a visitor to the site, they may be looking at say volunteering. Why not add a filtered blog at the bottom of the Volunteering page which only shows news in the category Volunteering. That way your news is still relevant to the topic being viewed. Therefore increasing the chance of it being read. 

Largely driven by the complexity and volume of posts (news items) on some sites I have created micro blogs for Recruitment, Volunteering, Fundraising, Events, and the Front Page as well as the general news page.

Retro Addition

All of this is fairly easy to add to an existing Divi website. If you are interested and would like this let me know.  


Check Your Forms

A reminder to check your forms from time to time. 

Once a form is set up and tested it should continue to work without any issues. However it is worth being proactive in case a problem has been introduced into the website through the plugin(s) associated with the function, wordpress upgrading, a migration that has recently happened, or your email has recently been changed by a third party. 

Email can get quite complicated because most email in circualtion, some speculate more than 90% is unsolicited junk mail. Much of it never reaches your inbox because it is filtered out at various locations as it transits the internet. 

But sometimes things do break for all sorts of reasons, and you might not know about it. If you normally receive email every day and your website contact form has not sent anything, please do go to your website and check the form by sending yourselves a message. It is very easy and quick to do. 

Here are two recent examples of failed systems

Introduction of Office 365 by a local installer. 

Mail goes into a junk mail folder, or is deleted before it reaches the inbox. 

Client “X” had a website which had a contact form on it, and it performed without issue for several years. Someone on the management team decides that they wish to move over to Office 365. They seek a third party specialist, the new mail system is set up everyone is happy, but nobody checked the website after the move to Office 365. 1 year later, someone raises a flag on it and tells me they never get messages from the website. Or in another case, why do all of the website messages go into my junk mail folder? 

Here is what happened; the Microsoft approved third party installer was either not told about the website, and the fact that it sends messages, or missed it. They installed Office 365 on the client computers, made changes to the DNS settings in the hosting (some of you have independent access to this area, it is available to all on request). One of the changes is for something called SPF or Server Policy Framework. It contains information about the name (IP Address) of the legitimate sending mail server(s). In this case it was changed to an Outlook server. Rather than incrementally adding to the current information in the SPF record which states your website can send messages legitimately, they overwrote it with only Microsoft Outlook Servers can send messages. 

This means that when a message came in from the website, the receiving server checks (it is actually an anti spam measure) who sent it. It was not the Outlook server specified so the message was continually rejected.  I would not know about this unless someone told me. It was done without my knowledge. 

In a second and more recent case and the reason I am flagging it here I found errors in the database on a site. 

I often use a staging area, and copy your current website to it, and rebuild it, then move it back. Within this process the database for all of the parameters which contain the address of the website are changed to the new location. I then rebuild the site, set up a new form and ask you to check it and approve it. 

Once approved I write the site back to the original location. I also ask people to check their forms when I do this. While I can add my name to your forms, I prefer you to check and confirm that you receive the forms rather than me check them 100% on your behalf. Technically, I cannot test your receiving system, so there is a risk you may have something locally blocking email. 

I found out that when writing the website back to the old hosting location, not all of the data is updated to the new address. There is a risk that your website forms are still being sent from the following address “wordpress@wingrove-staging.uk”  If that is the case, it is highly likely the form will not work. There are examples where I have asked people to check, they have not, and therefore this problem has not been detected for some time. 

I have worked my way back through the most recent 9 sites and checked them. Where I found the problem I corrected it. But the easiest thing for you to do, for peace of mind more than anything else, is check your form. Make sure it is working, and if it isn’t for any reason, let me know and I will take a look. 


Wingrove-Services
Privacy Overview

This website uses cookies so that we can provide you with the best user experience possible. Cookie information is stored in your browser and performs functions such as recognising you when you return to our website and helping our team to understand which sections of the website you find most interesting and useful.

You can adjust all of your cookie settings by navigating the tabs on the left hand side.

My privacy policy can be located here: Wingrove Media Privacy Policy (opens in a new window)

My Cookies Policy can be found here: Wingrove Media Cookies Policy (opens in a new window)